Photo fusing attempt #2 = partial success

BEFORE:

AFTER:

Next time I think I can have 100% success if I:
– stick to single-color glass (the ones with the multiple colors mixed together melt at different temps resulting in the wavy/distorted photo transfers… I think)

Reasons why I think even my next one might still not be 100% success:
– I don’t *want* to stick to single-color glass
– I still have temperature/speed experiments in mind

Next week we will see: hotel art.

Photo Transfers on glass. Attempt #1 = FAIL

BEFORE:

Going in to the kiln:

AFTER:

Well. I partially burned out the photo transfers and now I have blobs of slightly dirty looking melted glass that I don’t know what to do with. However, I also now have a better idea of how that kiln fires (i.e. how fast it heats up at different settings), so I’m trying again tonight.

oh also – just for the record, all of those images on there are straight off of random internets sites and not my own. And that clear orange turned a lovely shade of bright bright red.

Screwed?

This weekend I:

  • Fixed the shed door. New hinges = the door closes easily now 🙂
  • Finished assembling the compost bin – it is now one cohesive piece and will not fall over if you touch it. Let the composting begin in earnest!
  • Bought COE 96 glass and assembled some photo transfer fusing stuff. Photos of that to come later this week. The firing will probably be Tuesday night, so… no pictures of the outcome until Thursday (or later)
  • Assembled the working frame for the stained glass window. My mom, the stained glass teacher, was right…. putting it all in the frame pointed out how off-kilter it still was and I have much work to do to get it all to fit. But I made some progress.

The only picture from this yesterday’s projects worth showing is….


I guess i either got a little carried away with the electric drill or else I bought crummy quality screws. There are now two screws in the compost bin that are never coming out….

Cabinet knobs

Fused glass epoxied on to wooden shapes:

Still need to:
– stain the knobs
– cut & attach the threaded stick (name?) so that there’s something with which to attach the knob to the furniture
– refinish the furniture. ha ha. as if.

but no. really. even if i don’t refinish the furniture, I want to finish these knobs so I can see if this is anything that might be worth making for the new kitchen doors on the new kitchen shelves that I’ll be getting someday.

More fall fun, coming up!

I’m borrowing this from my parents:

Do you know what its primary purpose is?
Do you know what its secondary purpose can be?
(It requires one small, easy-to-make modification to perform as object #2.)

yes, yes. It requires some cleaning before it can be used. That is what the wire brush is for. and check out those #$@*(&!!! tomatoes still hanging out in the background. sigh.

Table-riffic!

I bought two tables this weekend. Both need some work.

Table #1 is from Saturday’s trip to visit my aunt:

It’s a folding table but it’s currently missing a leg. Which is interesting because I bought a leg for it on Sunday and the leg cost me more than the entire table did…. almost twice as much! (how does this happen?) Total cost to this point is still <$10 but still.
Table #2 is from Sunday’s trip to brunch @ D’s:

Step 1 = give it a good, long bath with lots of elbow grease:

Step 2 = decide whether to leave it as is, paint it some other color, or strip it & refinish it. Painted wood makes me a little sad sometimes, so I’m leaning towards the refinishing route…. which means chemical stripping in this case, I think. There are at least 2 layers, possibly three, to go through and they look like they’re old, possibly lead-based and will likely be a medium-pain-in-the-butt to get off…..

Tomato insanity!

Last year it was strawberries that my roommate and I got carried away with… this year it was tree farm produce….

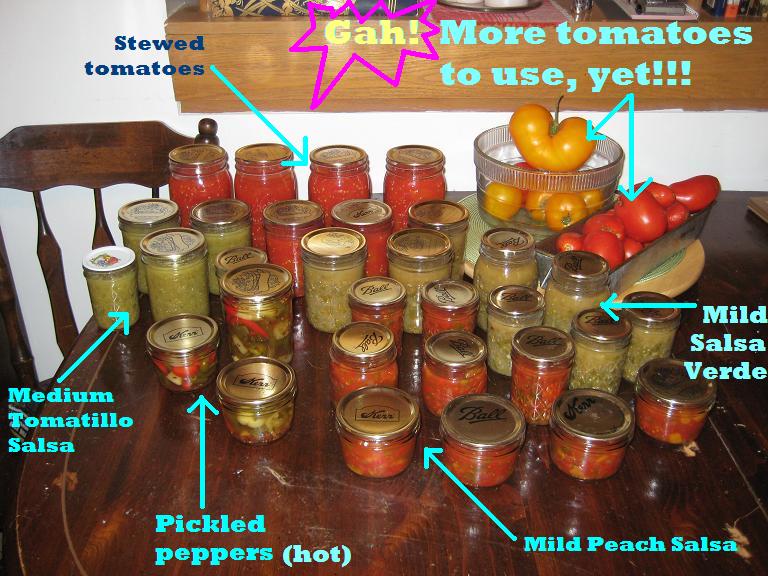
What you see here is 32 lbs of tomatoes, 15 lbs of tomatillos, and almost 5 lbs of hot peppers.

After much work (and notice it’s not even done!!! there are ever more tomatoes & tomatillos to deal with), it’s turned in to 4 quarts, 11 pints, and 16 half-pints of canned stuff. It also became some fresh salsa and some tomato soup. Click on this picture if you want to see what’s what.

AND this year was the first year ever where I exploded a few jars. Sadly, these all would have been pickled peppers if only they had survived (I tasted a few explodees and they were quite tasty) and so there are only 3 jars left of that particular experiment… at least they made a pretty cool “BOOM!” sound when they blew… (^_^)

Earlier this year I canned three different kinds of jam, too:
– blueberry, low-sugar
– blueberry-cherry-rhubarb
– blueberry-blackberry-gooseberry
The blueberries I picked in Michigan, the blackberries in Chuck’s backyard, and the gooseberries in my yard (they’re one of the new bushes in the highly contested borderline). But I don’t have any pictures of *that* process.

Changing purposes…

While in Ventura last weekend, I found a pretty nice macrame belt. Since I am not fond of wearing belts for show (I’m more of a utilitarian belt person 😉 I thought that it might make a nice necklace and/or bracelet… and it did!

I couldn’t resist taking a picture while I was unraveling the part that I cut. This makes me think of an alien bug, don’t you agree?